ATT&CKized Splunk – Threat Hunting with MITRE’s ATT&CK using Splunk
Most of us know MITRE and the ATT&CK(TM) framework that they have come up with. What a splendid job they have done for the cyber security community by bringing most of the key attack vectors under an organized framework that segregates these attack vectors in various stages of a typical attack. Moreover, not only they have orchestrated the key attack vectors but the mitigation and detection guidance for each attack vector are also part of this framework. Furthermore, the information about the threat actors, who are seen using these attack vectors in-the-wild, is also associated with every attack vector. Together, it is a complete package that any Threat Defense/IR team likes to have with them. Apparently, ATT&CK has received an overwhelming response from the community and in fact, every SIEM or Threat detection vendor out there in the market has started aligning their products to MITRE’s ATT&CK.

Previously, this
information on Indictors of Compromise (IOCs) was subject to a few threat intel
individuals who used to provide inputs to the detection teams (blue teams) to
improve on their detection capabilities and required to fetch from various
free/paid threat intel reports. With ATT&CK in place, we are covered with these
basic IOCs that every IR team should care about.
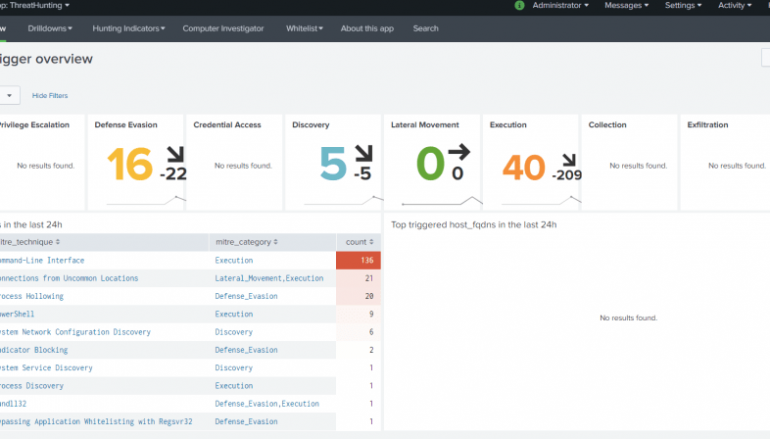
Now, the moot question is how to actionize ATT&CK framework. There are many genius people out there in the world to solve such problems and one of them is Olaf Hratong. He has developed a super cool app named “ThreatHunting” for Splunk that sits on top of Splunk Enterprise and gives us a very intriguing dashboards which are aligned with MITRE’s attack. The following is the screenshot of the overview dashboard of this App.

This is the
exact dashboard which one would have thought while going through MITRE’s
ATT&CK framework.
You can find the
repo on the git hub here: ThreatHunting.
The same can be found on splunkbase here:
https://splunkbase.splunk.com/app/4305/
I am writing this blog
to explain how to install and make this app up and running as it might get
tricky when you actually start using it.
Pre-requisites:
- Sysmon logs from your
environment - A few apps
Install the
following apps to your SearchHead:
So, let us start
with prerequisites
Sysmon logs : I hope all of us are familiar with Sysmon. If
not, nevermind. no big deal. Have a look at this link https://docs.microsoft.com/en-us/sysinternals/downloads/sysmon
Sysmon does not
log all the events by default hence the configuration file needs to be altered.
SwiftOnSecurity’s sysmon-config project
will come to our rescue and save our lot of time of developing this config
file.
The only caveat
to this is – as they say “nothing is perfect” in this world – so you may find
some configuration issues here-and-there in the file that you might need to rectify
manually. For example, after I install and configure the sysmon with this
configuration file, any modifications to AppInit_DLLs registry were not getting
logged while it should because the following two lines were the part of my
configuration file to catch them
<TargetObject
condition=”begin with”>HKLMSOFTWAREMicrosoftWindows
NTCurrentVersionWindowsAppinit_Dlls</TargetObject>
<TargetObject
condition=”begin with”>HKLMSOFTWAREWow6432NodeMicrosoftWindows
NTCurrentVersionWindowsAppinit_Dlls</TargetObject>
It turns out
removing ” after Appinit_Dlls in above lines, it started logging the changes
to AppInit_DLLs. So, such things can be figured out with experience and
trial& error. So, watch out for those misconfigs.
Downloading and Installing Sysmon:
Download Sysmon
from https://docs.microsoft.com/en-us/sysinternals/downloads/sysmon
Download sysmonconfig-export.xmlfile from https://github.com/SwiftOnSecurity/sysmon-config
and keep it in the same folder where Sysmon is kept.
Open up the
command prompt as an administrator and go to path where Sysmon is located and
fire following command

This will
install Sysmon with the specified configuration in the config file. You need to
tweak the config file as I mentioned above when required.
You can find the
sysmon logs under eventviewer under Applications and Services
Logs/Microsoft/Windows/Sysmon/Operational

Installation of Pre-requisite Apps
Then install the
above-mentioned pre-requisite apps from the Splunkbase on to the Splunk search
head. It sould look like as following

Okay, now, it’s
time to install the “ThreatHunting”
app which is available on the Splunkbase.
Hence, go to
“App Management” console on the Splunk search head and click on “brose more
apps” button and search for ThreatHunting app.

Click on the
install button and it will get installed. With this, you have added
“threathunting” and “windows” index to your index list which will be used later
in the configuration.
Once you are
done with that, we need to ingest our Sysmon data if not ingested already. I am
using stand alone instance of the Splunk for this demo purpose, however, you
may ingest the data the way you are doing it for other similar logsources. The
keypoint here is to ingest this data in “windows” index.
PS: You can ingest this data in any index that you want but then you got to modify the ThreatHunting App’s configuration accordingly. The following is the steps to get the Sysmon data in for a standalone instance of Splunk.
Go to Settings->Data-> Data inputs

Select
Microsoft-Windows-Sysmon/Operational from Available log(s) and select the index
“windows” form the dropdown box as show below

and click save.
Go to
ThreatHunting App and click on “About this app” and click on “Edit Mocro’s
here”


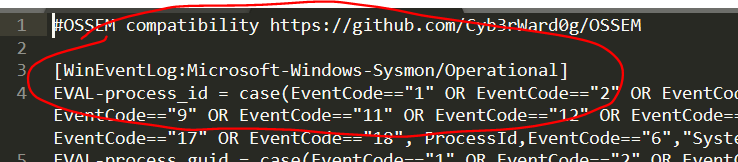
Go to “sysmon”
in the macro and update the index and the sourcetype that you are
using. Default config comes with sourcetype as “sourcetype=”XMLWinEventLog:Microsoft-Windows-Sysmon/Operational” which needs to
be changed as shown above in the snippet. At the same time, props.conf also needs to be changed
with the correct sourcetype. Go to
splunk/etc/apps/threathunting/default/props.conf and change the sourcetype as
shown in the figure below.
Finally, you
have to upload the lookups to the lookup folders in the App. Download the
lookups from here
and past them under lookups. These are
blank lookups, you may need to populate them with actual whitelisting data.
Once that is
done, we are done with the basic config and it’s a show time. Go to the
ThreatHunting App and click on the “Threat Hunting trigger overview” and if you
are luck your dashboard should have started populating with the data in your
environment.
Now, mind you,
this will again open the flood gates and your dashboard might get populated
with exaggerated numbers. As I said earlier, This App comes with Whitelisting
lookups that you may need to update with the whitelist entries – that would
help in reducing to the real suspicious events that you want
to investigate. Nonetheless, this exercise will give you a deep insight about
how your environment works.
Happy hunting, fellas!!
About the Author: Kirtar Oza
Kirtar Oza, CISA, CISSP, is an ardentcyber security professional with a strong background in Cyber Security. With more than twelve years of experience in various areas like Cloud Security, Threat and Incident Management, DevSecOps, Vulnerability Management,IT Governance and Risk Management, he has been involved in assessment and development of security strategy and road-maps for several organizations. He has also been quoted frequently in Times of India (TOI) on Cybercrime-related stories. His area of interest is to research on the cybercrime eco-system and develop actionable and predictive intelligence to protect critical infrastructure. He has been lately involved working on the domains like DevSecOps, Incident Response and cloud security. He has achieved his MSc in Computer Networks from University of Technology, Sydney (UTS) Australia.
LinkedIn Profile : https://www.linkedin.com/in/kirtaroza/
Twitter Handle : kirtar_oza
This post ATT&CKized Splunk – Threat Hunting with MITRE’s ATT&CK using Splunk originally appeared on Security Affairs.